

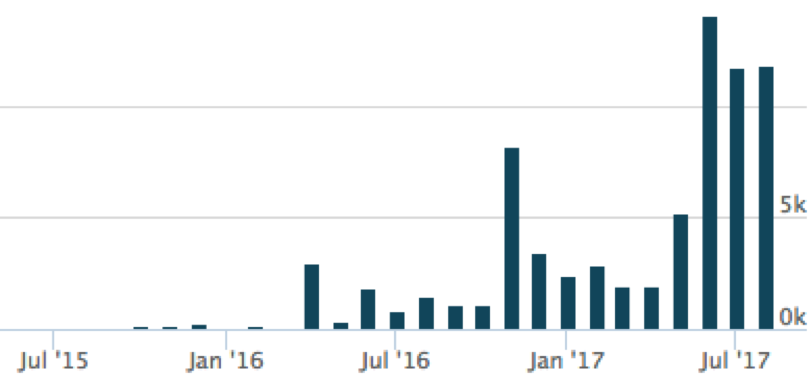
AgentTesla is a fairly popular key logger built using the Microsoft .NET Framework and has shown a substantial rise in usage over the past few months.
It offers all of the standard features of a keylogger but goes beyond the typical confines of this type of software. One particular feature of interest is the custom packer it uses to hide the primary AgentTesla binary. Packers allow for a binary to essentially be wrapped in another binary to mask the original one from detection.
There are a number of excellent blogs out there covering AgentTesla’s functionality and it’s various obfuscations, but having I recently unpacked a sample and wanted to focus on this particular function and provide some helpful tools to aide in unpacking it.
For this analysis, I’ll be using a PE32 version AgentTesla file seen in the wild on August 29th with hash “ca29bd44fc1c4ec031eadf89fb2894bbe646bc0cafb6242a7631f7404ef7d15c”. You’ll find AgentTesla delivered commonly via phishing documents that usually contain VBA macros to download and run a file – like the one in question.
As it’s a commercial product, you’ll find a lot of variety in the initial carrier files that deliver the AgentTesla binary; however, at some point you’ll find yourself with a PE.
Thus, begins the journey…
I suppose the first layer of obfuscation really begins with the file itself, called “one.jpeg.png.exe” and an icon of a JPG trying to create an illusion of legitimacy.
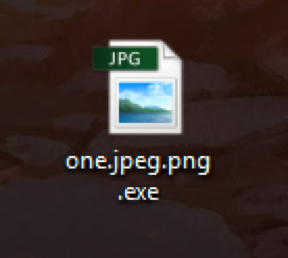
This is a common technique to fool people and they’ve taken it one step further by opening an image when you execute the binary.
The first executable is a .NET application, which is no surprise since AgentTesla is very well known for being a .NET key logger. To analyze .NET applications, I prefer to use the application dnSpy and, once loading up this sample, we can see there is only one namespace of interest with a handful of functions and a byte array.
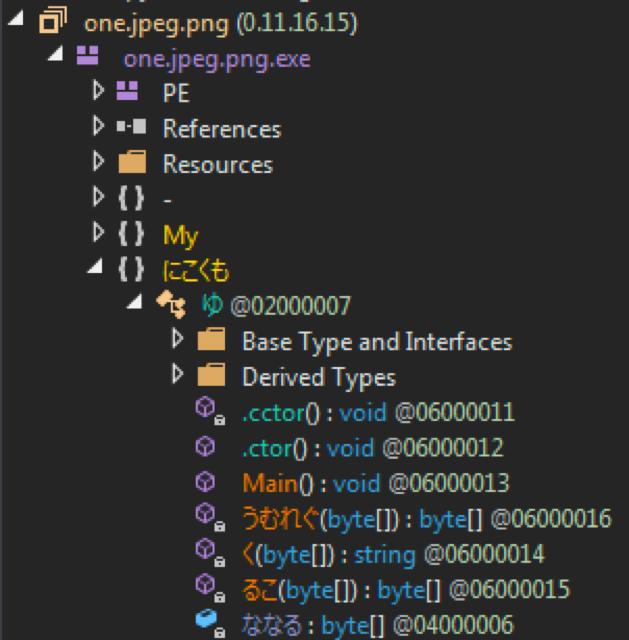
The Japanese kanji stands out at first glance but I believe this is less about language and more about being a form of obfuscation – I’ll explain why shortly.
Looking at the Main() function shows a pattern of multiple calls to two other functions.
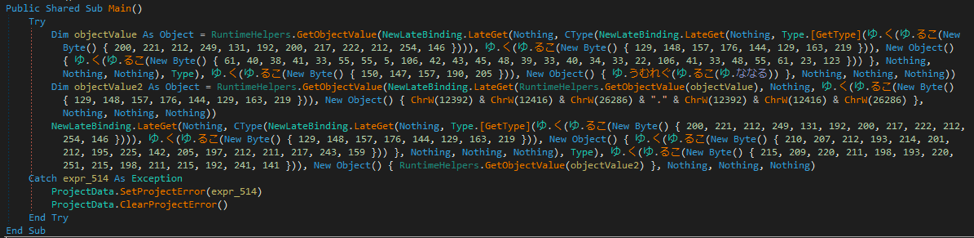
Take for example the below string.
|
1 |
ゆ.く(ゆ.るこ(New Byte() { 129, 148, 157, 176, 144, 129, 163, 219 })), |
The namespace is “ゆ” and the functions are “く” and “るこ”, with the latter taking a byte array as input and then the resulting output of that function being passed to the former.
Starting with the first function, there are two XOR operations that occur with what looks like two values from the passed in byte array and then a static XOR key.
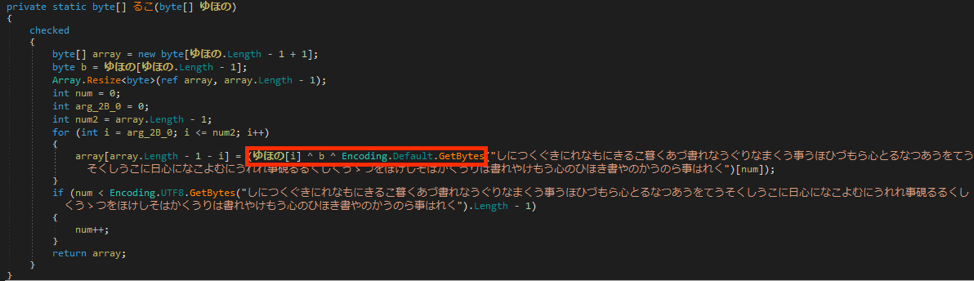
Looking at this function deeper, it uses the last value in the byte array as one of the 3 XOR keys, then adjusts the array in size and begins the decoding loop. Starting at the first byte, it will take this number as the second XOR key and increment it each iteration. The final XOR key is pulled from the GetBytes call on the long string of kanji.
Before going any further though, can you spot the issue with the function above? It works and successfully decodes the byte array but there is a flaw in codes logic that threw me for a loop when trying to implement the code in Python.
If you manually XOR those values together (129 [first byte] ^ 214 [last byte] ^ 12375 [first kanji]), the resulting output isn’t what gets returned within the debugger. In fact, it’s not even close which left me scratching my head for a while.
|
1 |
129^214^12375 = 12288 (0x3000) |
Instead, what we end up with is 104 (0x68). It’s clearly wrong though and I assumed I was missing something in what appeared to be a relatively straight forward, par for the course, decoding function. If I XOR the know good result with the two values from the byte array, I end up with 63 (0x3F), otherwise known as “?”.
What’s happening is that the GetBytes call is set to use the default system encoding, which in my case is Windows-1252, so the bytes fall outside of the acceptable range and all return as 63 (0x3F), regardless of where the index pointer is in the array. Given this, the only two values I ever need to worry about are within the array itself and I can ignore most of this code.
Below is a small Python script which will decode the strings passed into it.
|
1 2 3 4 5 6 7 8 9 10 11 12 13 14 15 |
def decode(a): xorkey = a[-1] a = a[0:-1] b = [0] * len(a) num = 0 counter = 0 maxlength = len(b) - 1 while counter <= maxlength: b[len(b) - 1 - counter] = chr(a[counter] ^ xorkey ^ 0x3f) counter += 1 return "".join(b) >>> a = [129,148,157,176,144,129,163,219] >>> decode(a) 'GetType' |
As the string successfully decodes with using XOR key 0x3F, it implies it was also encoded with this value initially, so the default code page used by the author when encoding it was also most likely Windows-1252.
The reason I believe the kanji is more for obfuscation than anything else is because of this and what the XOR key displays, which is nothing but a jumble of random characters without any coherent message.
This randomness in function and variable names is similar to the techniques they use in later payloads but now with a different character set.
For the second function, “く” it simply returns a string from the byte array of the previous function.
Going back to the previously mentioned byte array, it’s quite large and only has one reference inside this code, highlighted below.

After the byte array is passed to the decoding function, the output is used as input into a new function, “うむれぐ”, that is responsible for decompressing the data.
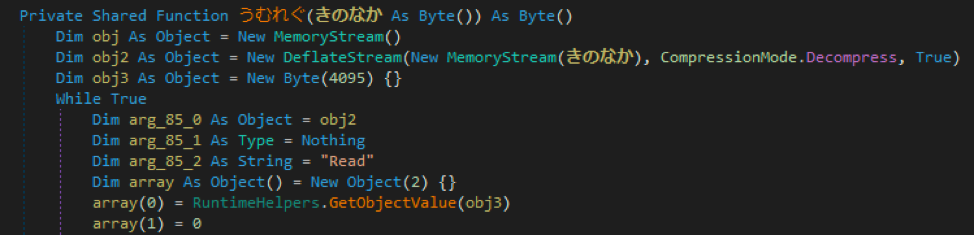
Once decompressed, the new data is returned in a byte array.
At this point I copied out the list of integers for the byte array and ran it through the decoding Python function and decompressed the it with the zlib library into the next payload.
|
1 2 3 |
fh = open("output", "w") fh.write(zlib.decompress(decode(a), -15)) fh.close() |
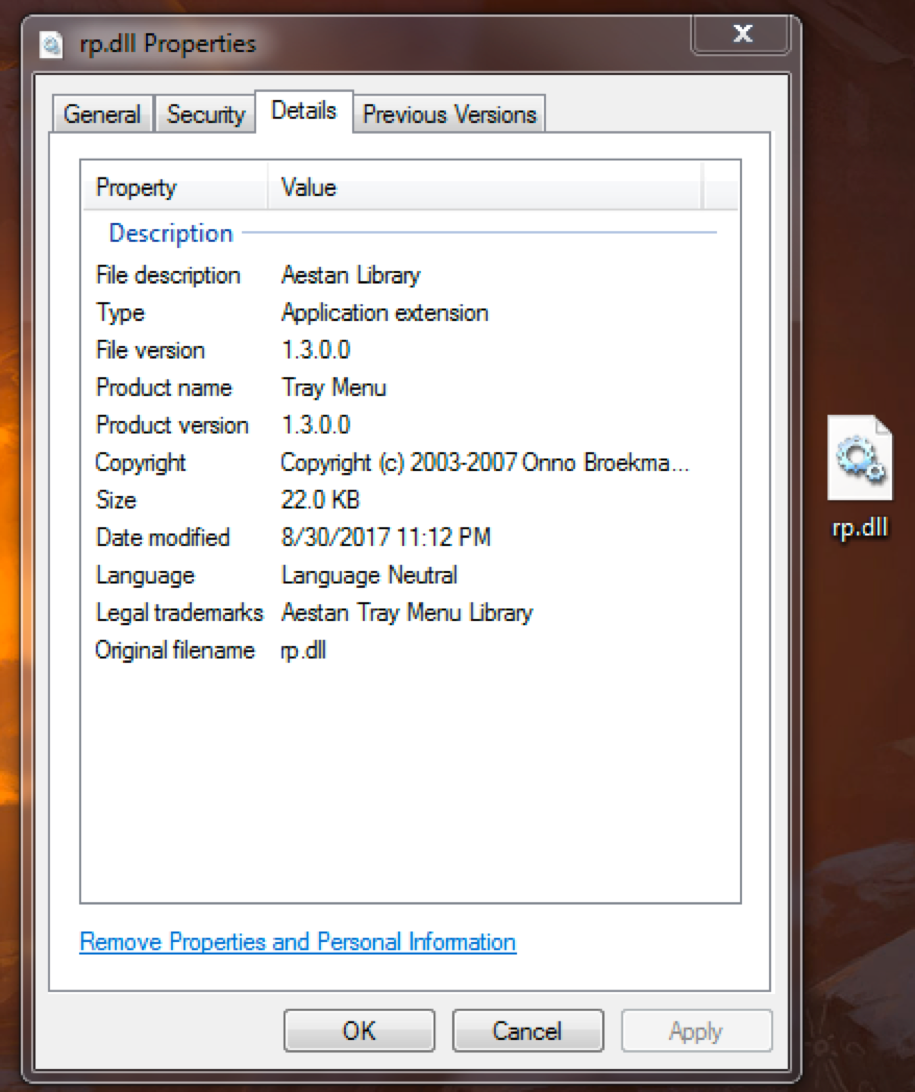
Looking at the new file shows that it is a DLL named “rp.dll”.
This was also a .NET file and we can load it into dnSpy for further analysis; however, before doing that I’ll go over the final part of the first packer.
|
1 2 3 4 5 |
Dim objectValue As Object = RuntimeHelpers.GetObjectValue(NewLateBinding.LateGet(Nothing,CType(NewLateBinding.LateGet(Nothing, “System.Type”,“GetType”, “System.Reflection.Assembly”, Nothing, Nothing, Nothing), Type), “Load”, BINARY_ARRAY, Nothing, Nothing, Nothing)) Dim objectValue2 As Object = RuntimeHelpers.GetObjectValue(NewLateBinding.LateGet(RuntimeHelpers.GetObjectValue(objectValue), Nothing, "GetType", "とむ暮.とむ暮", Nothing, Nothing, Nothing)) NewLateBinding.LateGet(Nothing, CType(NewLateBinding.LateGet(Nothing, Type.[GetType]("System.Type", "GetType", "System.Activator", Nothing, Nothing, Nothing), Type), "CreateInstance", New Object() { RuntimeHelpers.GetObjectValue(objectValue2) }, Nothing, Nothing, Nothing) |
I’ve cleaned up the encoded strings so you can see what it’s doing but effectively, it takes the DLL assembly, loads it, and calls the main function, “とむ暮.とむ暮”, within it.
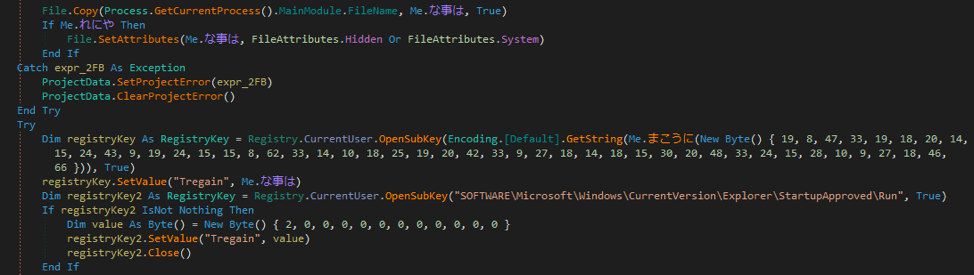
This DLL uses the same byte array string obfuscation as the initial executable.
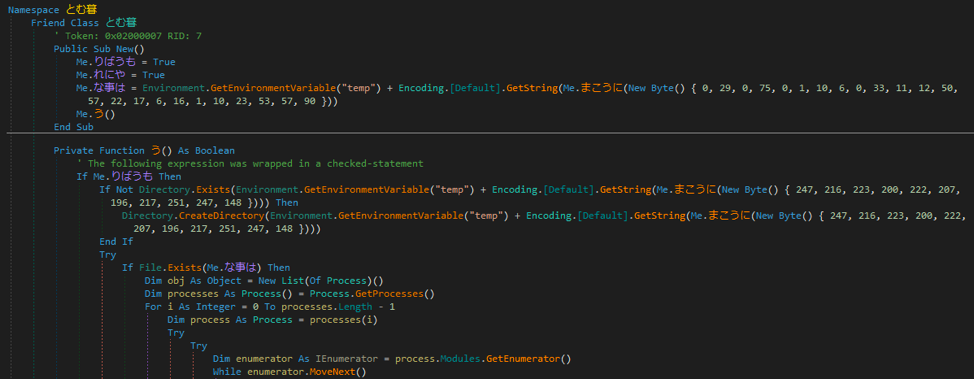
In the above image, you can see it begins by checking whether the file “\\Products\\WinDecode.exe” exists and then will create the “\\Products\\” directory if it does not. After that it will enumerate processes to kill, delete files, establish itself in the registry for persistence and other characteristics typical of this malware.
But, eventually during the execution, you’ll end up at the next part of the unpacking code.
|
1 2 3 |
Dim obj2 As Object = とむ暮.れなつ(Me.まこうに(Me.こなき(Me.れな()))) Dim うひ硯る As うひ硯る = New うひ硯る() Return うひ硯る.う("Nothing", String.Empty, CType(obj2, Byte()), True) |
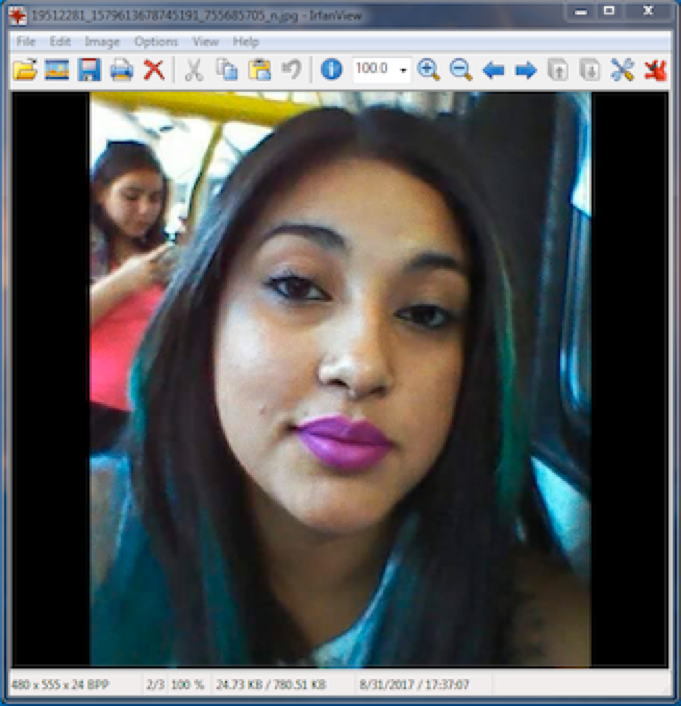
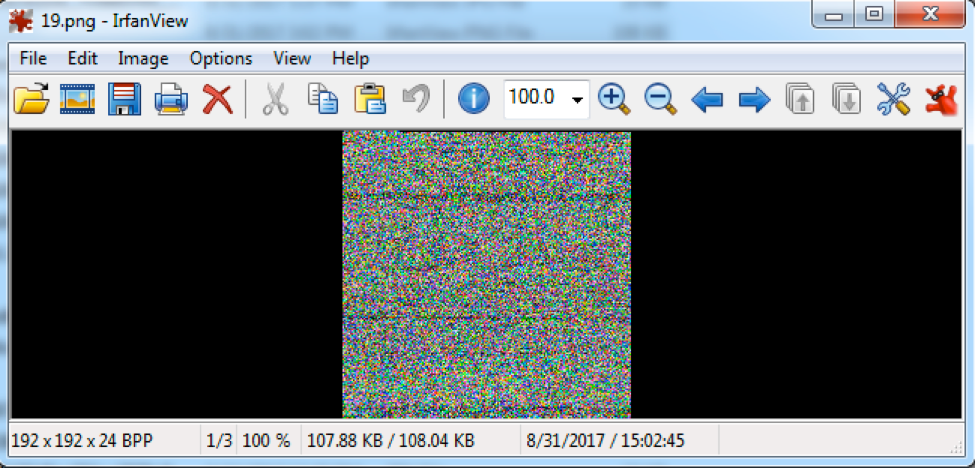
The first line calls multiple functions - starting on the far right is “れな”. This function can be seen below and creates an object from a PNG file in the resources section of the DLL.

Picture Time
The PNG itself doesn’t visually show anything of note but static.
The next function “こなき” is a bit more interesting.
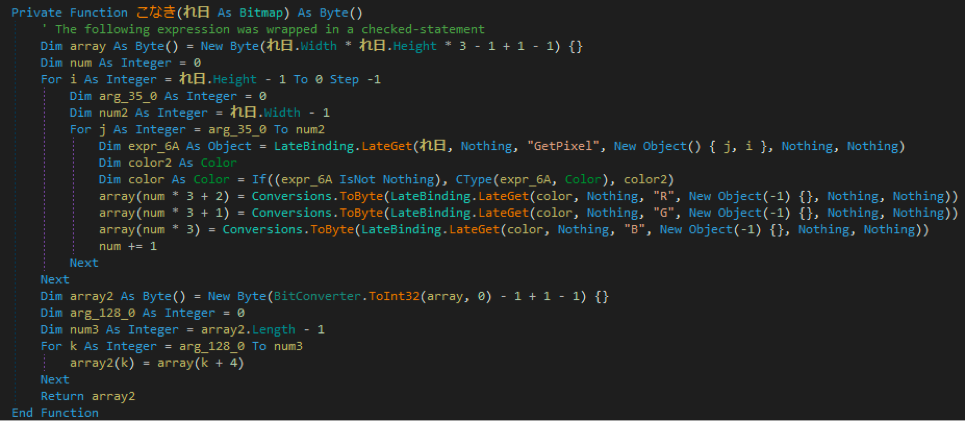
This loads the image as a bitmap and then it will read the pixels in a certain order to build an array from the values for Red, Green, and Blue that get returned.
For example, if you look at the bottom left of the image (0,192), you will see a dark green with the hex value 0x1AE2C.
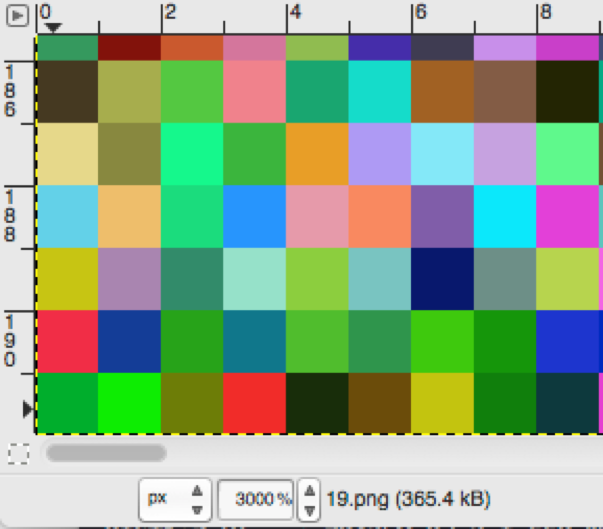
The first entries in the array would be 0x2C (Blue), 0xAE (Green), 0x1 (Red)
To unpack this, I once again re-wrote the code in Python and used the Python Imaging Library (PIL) to extract the bytes. This particular image is 192x192 pixels and 24bits per pixel (3 bytes – RGB) and it iterates over each pixel from left to right, bottom to top, for the array of data.
|
1 2 3 4 5 6 7 8 9 10 11 12 13 14 15 16 17 |
from PIL import Image im = Image.open("/Users/pickleRICK/19.png") def imparse(a): width, height = im.size counter = 0 b = [0] * (width * height * 3) for y in range(height - 1, -1, -1): for x in range(0,width): pixel = im.getpixel((x,y)) b[counter * 3 + 2] = pixel[0] # R b[counter * 3 + 1] = pixel[1] # G b[counter * 3 + 0] = pixel[2] # B counter += 1 while b[-1] == 0: del b[-1] return b |
After it returns, the byte array gets passed to the now familiar decode function and then the deflate function.
|
1 2 3 4 5 6 7 8 9 10 11 |
>>> dec = imparse(im) >>> dec [44, 174, 1, 0, 237, 11, 8, 125, 109, 41, 15, … >>> dec = decode(dec) >>> dec '\xec\xbd\tx\x1c\xc5\x95\x00\xdcs\xf59#\xa9\xa6G … >>> dec = zlib.decompress(dec,-15) >>> dec 'MZ\x90\x00\x03\x00\x00\x00\x04\x00\x00\x00\xff\xff\x00 … |
As you can see, we have the MZ header and the next binary.
Within the DLL are additional functions which handle executing the new payload and I’ve gone ahead and decoded some of the native API’s they use to show how they carry out activity.

The final payload
Arrival of the last binary – another .NET application called “RII9DKFR5LC4Y669MLOA2C50SFLPHZBN61CZ160Z.exe”. If you read any of the posts mentioned earlier on the analysis of AgentTesla, then this will look familiar.
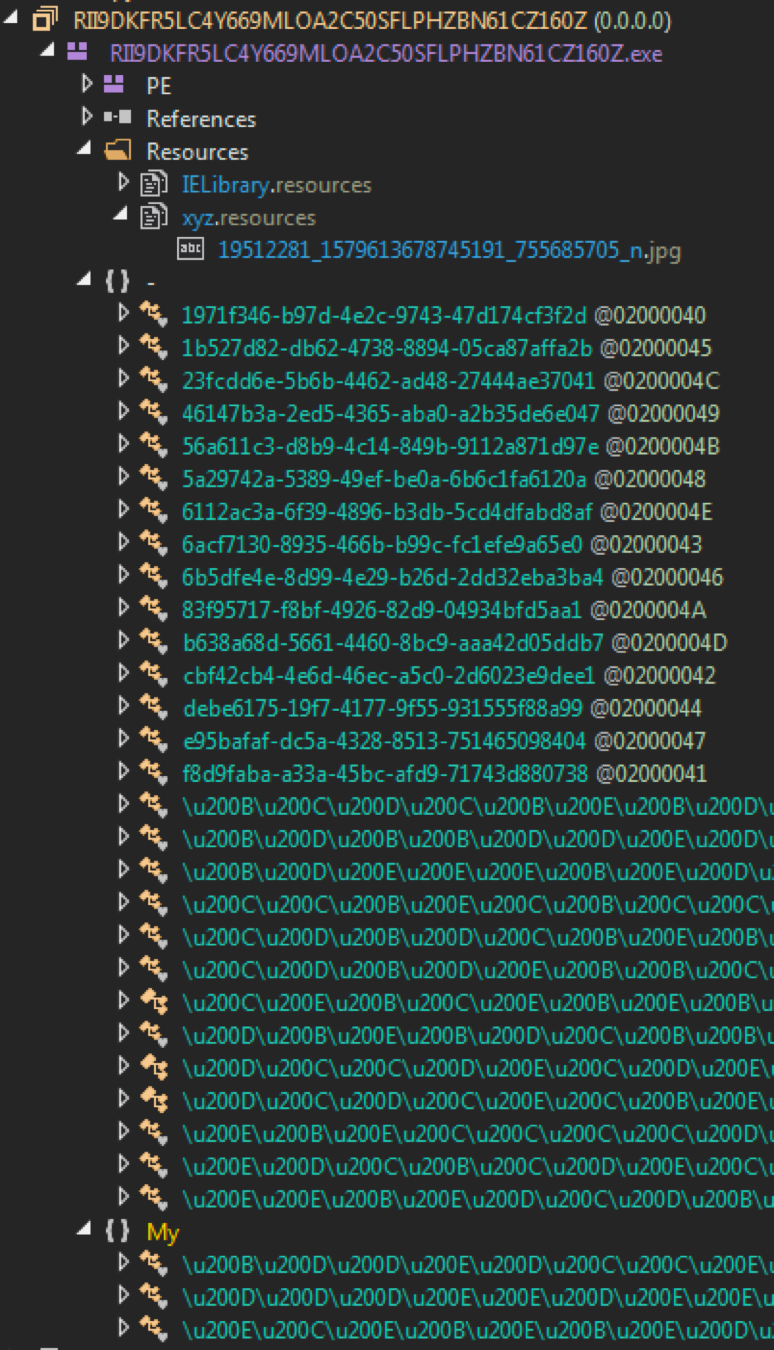
Function and variable names are encoded with Unicode values in the range of 0x200B-0x200E. Strings are decrypted by, in this sample, function “KMBHFDXSELJYYLVK\u3002”.
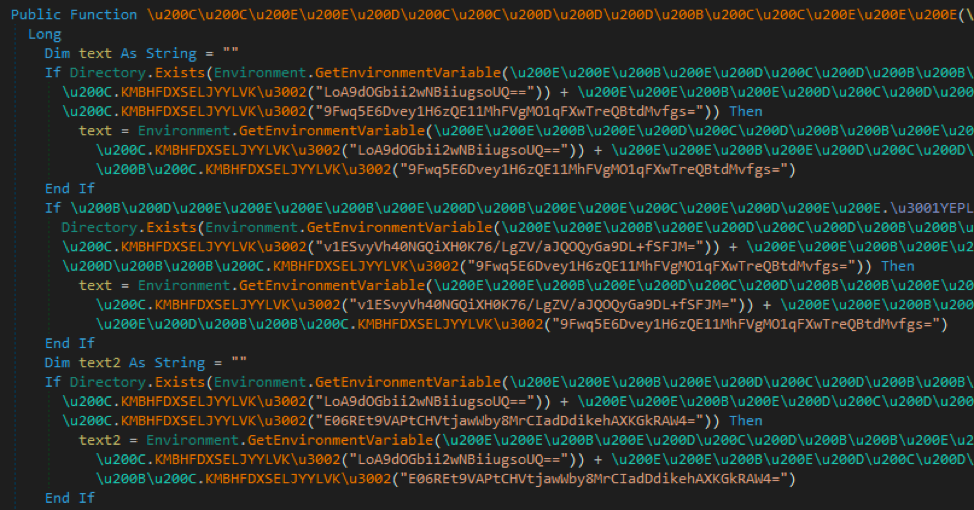
This function uses a hardcoded password and salt to derive a key from the SHA1 hashing algorithm as implemented by Microsoft (modified PBKDF1). Afterwards, it uses the key and hardcoded IV to decrypt the string with AES-CBC.

A quick Google for that IV shows hundreds of results for it, with most revolving around an encryption example that was used as the base for this function – it even copies the examples variable names.
What I found interesting here is that none of these values ever change sample to sample. Even going back to the samples in the write-ups on AgentTesla from over 6 months ago, I was able to decrypt their base64 strings listed in the blog. This confirms the same values are in use and likely hard coded into the builder for AgentTesla.
Given that everything is static then, it’s fairly trivial to extract all of the base64 encoded strings, decrypt them, and look for interesting IoC’s.
|
1 2 3 4 5 6 7 8 9 10 11 12 13 14 15 16 17 |
from Crypto.Cipher import AES def stringdecrypt(a): string = base64.b64decode(a) iv = "@1B2c3D4e5F6g7H8" key = "\x34\x88\x6D\x5B\x09\x7A\x94\x19\x78\xD0\xE3\x8b\x1b\x5c\xa3\x29\x60\x74\x6a\x5e\x5d\x64\x87\x11\xb1\x2c\x67\xaa\x5b\x3a\x8e\xbf" #to 6a/5e for first iteration cleartext = AES.new(key[0:32], AES.MODE_CBC, iv).decrypt(string) return cleartext fh = open("extractedb64") content = fh.readlines() fh.close() for i in content: try: dec = stringdecrypt(i) print "%s | %s" % (i.strip(),dec.strip()) except: pass |
What we end up with is a long list of values like the below.
|
1 2 3 4 5 6 7 8 9 10 11 12 13 14 15 16 17 18 19 20 21 22 23 24 25 26 27 28 29 30 31 32 |
cWUeT8dJU4KfzxUEgGflzQ== | temp y9/s0/2Soj9dWZ7YCF9viw== | \des_date.txt hQ1zQ5Cg31OSE+BZ2Os36w== | 2017-08-25 cWUeT8dJU4KfzxUEgGflzQ== | temp y9/s0/2Soj9dWZ7YCF9viw== | \des_date.txt 1IhffSZWWBl13XPDs8n3myYCTMqLedaSKEkL/imL258= | dd.MM.yyyy HH:mm:ss cWUeT8dJU4KfzxUEgGflzQ== | temp aXsej6rp5uxy+3ym08w3iA== | ApplicationData haLsi+cj0yodiuWmM+o4Wg== | appdata AnV66gJ6ewY8YTWIByRSMA== | Temp cWUeT8dJU4KfzxUEgGflzQ== | temp zYMGsY8aSA781gMxSStsC9UAfia6hLdLRxgBeS3NtD0= | \Java\JavaUpdtr.exe cWUeT8dJU4KfzxUEgGflzQ== | temp y9/s0/2Soj9dWZ7YCF9viw== | \des_date.txt Akq+/Qobe3bW+jdjmv5oI6h1rNqdq+rlANdh6Ef29KelgAp0y6gsCspLDS+k+xmNC9TpnFhgwZyL///RhoSWxQ== | Software\Microsoft\Windows NT\CurrentVersion\Windows aZG83zDiQxysOvFJFc8qmg== | Load 8mFIzTz8+GxS3SBdy62qeA== | JavaUpdtr IMqa7/uMjEFhAZrJPRn9Gw== | False qQj4VB+mzRT8iDf7llcE6Q== | xyz hyNN5z+7qAsS695lDXLuHg== | True … 82ZGUDSQrPCv8v1Hf+HpRA== | </span> BJsW0oB1ieLYwE8A0Yu6OlLBTcrh0varR+ibOkyOCrk= | mylogbox4h@gmail.com 2qbrW8tf2IZoaPGZlcaKWw== | /log.tmp v4EpbnhZTubu6HTjEZ8Gdw== | [SavedLog ( I/tDnJPWEB6yySAivkY/576ixyY2gOP+bLVbbaRIV8A= | yyyy_MM_dd_HH_mm_ss 2qbrW8tf2IZoaPGZlcaKWw== | /log.tmp Q9Yhy5Uive3G6Gspdid9EQ== | Saved_Log_From_ eCqe8oqjGUIRwUWqnBrrpA== | / q542gy/+wDIUJhH3OGKnNg== | - 3TzIyOOSC+3lcpPaeTxO6g== | _ 4T5LGk6qEvqUS2xRJLUlww== | .html |
File names, registry keys, and e-mails to start off hunting with. You can also see where the corresponding base64 is within the code and then use dnSpy to obtain further context on how AgentTesla utilizes these values.
For example, below is something that stood out as interesting almost immediately.
|
1 2 3 |
4nmIR8y7iw8axs2u6GfIQ8f/7fSpMKvqD0ODaew16nI= | mylogbox3h@gmail.com 5XDX6cForslWY791UzW+zw== | sammy1990 wf990RzBidRdPMgWIckJ2g== | smtp.gmail.com |
Pivoting to these values in dnSpy will land you in a function that seems responsible for sending the stolen data back to the attacker.

Pivoting on a hunch
At this point, I’ve accomplished the goal I set out for – covering the packing techniques used by the current version of AgentTesla, offering some code to automate unpacking and decrypt some configuration data.
But why stop when you’re ahead?
I like to Google static values and constants when analyzing malware because you can usually find some interesting stuff – configurations, forums, accounts, panels, etc. When I began searching for the file “one.jpeg.png.exe” I stumbled across a site, “b-f-v[.]info”, which hosts various versions of this keylogger.
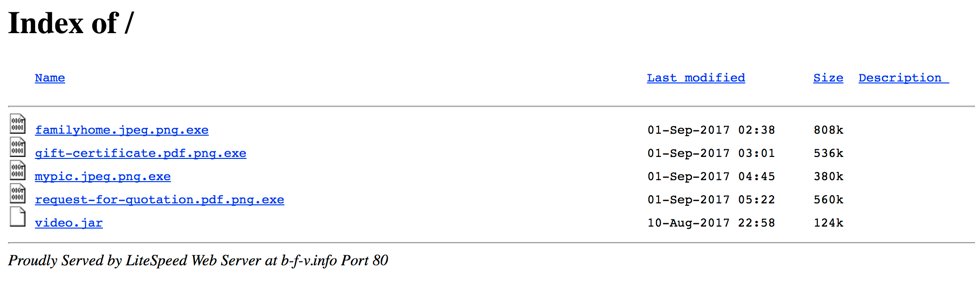
They all function in the same way but the image that displays is related to the first part of the file name. The images are various sizes so the decoding would be different for each; however, the code shown previously will grab the correct Width and Height for building the array.
Also take note of the dates and when they were modified. The sample covered in this blog was seen on August 29th, just two days before these were created – so the person or group behind these appear to be actively creating new versions to send out. I confirmed in these samples we find the same SMTP credentials.
Conclusion
Hopefully this overview of their packing techniques, along with the scripts to unpack each phase, prove helpful to others when looking at AgentTesla. Given its recent spikes in popularity, it’s likely not going anywhere anytime soon so the more knowledge you have of the threat, the better you can defend yourself.
You can continue to track this threat through the Palo Alto Networks AutoFocus AgentTesla tag and you will find the hashes for all of the files covered in this blog below:
Indicators of Compromise
Initial PE32
one.jpeg.png.exe | ca29bd44fc1c4ec031eadf89fb2894bbe646bc0cafb6242a7631f7404ef7d15c
mypic.jpeg.png.exe | cb0de059cbd5eba8c61c67bedcfa399709e40246039a0457ca6d92697ea516f9
familyhome.jpeg.png.exe / myhome.jpeg.png.exe | 444e9fbf683e2cff9f1c64808d2e6769c13ed6b29899060d7662d1fe56c3121b
gift-certificate.pdf.png.exe | 124bb13ede19e56927fe5afc5baf680522586534727babbe1aa1791d116caeeb
request-for-quotation.pdf.png.exe | dce91ff60c8d843c3e5845061d6f73cfc33e34a5b8347c4d9c468911e29c3ce6
DLL’s
rp.dll | 3c48c7f16749126a06c2aae58ee165dc72df658df057b1ac591a587367eae4ad
rp.dll | a5768f1aa364d69e47351c81b1366cc2bfb1b67a0274a56798c2af82ae3525a8
Second stage encoded images
19.png | e42a0fb66dbf40578484566114e5991cf9cf0aa05b1bd080800a55e1e13bff9e
72.png | cd64f1990d3895cb7bd69481186d5a2b1b614ee6ac453102683dba8586593c03
AgentTesla
RII9DKFR5LC4Y669MLOA2C50SFLPHZBN61CZ160Z.exe | 3e588ec87759dd7f7d34a8382aad1bc91ce4149b5f200d16ad1e9c1929eec8ec
B92MKZFESR6J7R2PNQ9ZTBA6QN0LIEXTUQEVH3T3.exe | 8fb72967b67b5a224c0fcfc10ab939999e5dc2e877a511875bd4438bcc2f5494
Get updates from
Palo Alto
Networks!
Sign up to receive the latest news, cyber threat intelligence and research from us
By submitting this form, you agree to our Terms of Use and acknowledge our Privacy Statement.